I was able to mostly finish the assembly of my modern scout rifle (MScR)--i.e., my AR 308--over the weekend and take it out to the desert for a quick test fire.
When I last wrote about this, I had completed putting together all the parts for the lower. But with the arrival of my bolt carrier group (BCG) and handguard (with the barrel nut), I was ready to put the upper together.
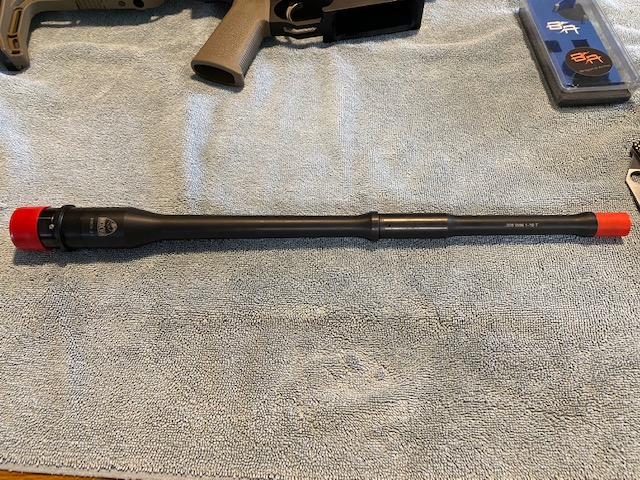
The barrel I used was the Faxon Big Gunner barrel in a 16-inch length and set up to use a mid-length gas system. As you can see, this is a fully nitrided barrel. The twist rate is 1:10 which is typical for .308 barrels. This barrel is similar to the pencil barrels but is medium contour behind the gas block (and pencil profile ahead of the gas block) which gives it some extra heat absorbing mass and increased stiffness. Faxon lists the weight as 1.91 pounds for the Big Gunner versus 1.78 pounds for the 16-inch pencil profile barrel.

I picked up a no-name nitrided mid-length gas tube at a local store.

To save weight, I picked up a 2A Armament titanium gas block, which has a listed weight of 0.70 ounces. Very nicely manufactured and, because it is manufactured in Idaho, I'm supporting the local economy.
 |
| Clip that goes around the barrel alignment pin. |
 |
| The "clip" just slides over the pin from the top. |
 |
| Barrel pushed into place. |

For the handguard and barrel nut, I selected the Brigand Arms Carbon Black EDGE Handguard which comes with a propriety aluminum barrel nut to which the handguard attaches. Because of the short barrel and mid-length gas system, I only needed the 12-inch long handguard. The total weight for the handguard and barrel nut for my configuration was 7.7 ounces.
 |
| Brigand Arms carbon fiber handguard and barrel nut as it came from the box. |
I could have used a Roam Rifles handguard made of magnesium which had roughly the same weight, but I had settled on the Brigand Arms handguard even before I chose the Roam receivers, and I sort of like the solid look of the tube and round shape. (The Brigand Arms handguard is not a truly solid tube, but has M-Lok slots in the 12, 3, 6, and 9 o'clock positions). Also, the shortest length offered by Roam was a 15-inch model, which I was afraid might be too long for my barrel.


Above are a few photographs of the barrel nut. It is an interesting design and is actually 3 nuts. The aluminum portion of the barrel nut (the primary section with the 5 holes--the middle one of which is larger and for the gas tube to slide through) is threaded inside and outside. The inside portion is threaded for the gas tub and the barrel locking nut, and the outside is threaded for the handguard and its locking nut.
So, you screw the aluminum barrel nut onto the receiver like normal. But it is not actually the nut that locks the barrel onto the receiver. Rather, you then take a steel locking nut and screw that into the aluminum barrel nut until it contacts the locking ring on the barrel extension. This is what actually tightens the barrel against the receiver. It is a little time consuming to adjust the barrel nut and barrel locking nut so that it everything is tight but also still aligned so that the gas tube can pass through the barrel nut and into the upper receiver.
I should note that the barrel locking nut is tightened with a standard barrel nut wrench, so you don't need to any proprietary tools to install it.
The outside threads for the handguard are very fine--like those on a camera for a camera lens. In any event, you screw the handguard down to where you want it, and then tighten the steel handguard locking nut against the handguard. It's hard to see in the photograph, but there are narrow slots cut at intervals around the handguard locking nut that you can use a small hammer and brass punch to put the final tightening on the locking nut. (I recommend brass so you don't mar the steel on the locking nut). I hadn't tightened this up very well initially, and it loosed somewhat during my test fire--so be sure to tighten it up with the punch and hammer.
 |
| In this photograph, I have screwed the handguard into place, but have not yet tightened the locking nut. You can see the gap between the locking nut and the handguard. |
 |
| And here is what it looks like when you have it all put together. |
I had decided to go with a combo muzzle compensator/flash hider from 2A Armaments, also made of titanium (weighing in at 1.7 ounces), but could not get the timing correct with the included crush washer. I have ordered a shim set and should soon have it attached. Yes, I do have the silver color because I didn't realize that 2A Armaments also made a black model. Nothing that some high temperature black paint won't fix.
Finally, I installed the bolt and charging handle. For the bolt carrier group, I went with the KAK LR-308 BCG with a double ejector. I originally was going to use an black melonited Aero Precision BCG, but the KAK was only a few dollars more and had the double ejector. Since I had read of people having problems with ejection of the cartridges, it seemed a no brainer to get the KAK product.
The charging handle I wound up using was the Radian Raptor charging handle for the AR 10. This is a fully ambidextrous handle with extended "wings" that give a better grip on the handle, especially when using a scope. I have a similar handle on an AR-15 and have really liked it.

Finally, for sights, I switched a Burris AC 332 that I was using on an AR 15 rifle to this rifle. It is a low power (3x) scope with an illuminated bullet drop compensator reticle with a large "donut" for quick shots. It has has a reputation for it ruggedness and durability, even being referred to as the poor man's ACOG. Although not forward of the action as Cooper recommended for his Scout Rifle, I think it meets the spirit of his requirements: a low power scope that was quick for alignment and shooting.
So, let's talk weight. My goal was a sub-6 lbs. without the scope and sling, and sub-7 lbs. with the scope and sling added. Prior to adding the scope, the completed rifle was 6 lbs. 2 oz. according to my scale, and jumped to 7 lbs. 3 oz. with the scope attached. So I came in a little over my goal. I could probably have met my goal if I had gone with the pencil profile barrel. I could have also met my goal using a titanium BCG. However, unlike other titanium products which were reasonable priced compared to other similar products, a titanium BCG is at least twice as expensive as a steel BCG. Nevertheless, it is still very lightweight compared to standard AR 308 rifles, and lighter than my bolt-action .308 I've used for hunting in the past.
The balance of the weapon was very good. With the lighter barrel and handguard, the balance point is at the rear of the magazine well which makes for a very quick and handy rifle. I was very pleased, in fact, on how the rifle felt in the hand.
The shorter 16-inch barrel also contributed to how quick and handy the rifle felt. This would definitely be a good rifle for hunting in dense brush or woods, or for using for self-defense in the confines of a house.
Finally, I was able to take the weapon out for a quick function check. I took along some 7.62x51 ammo from Tula (steel cased), Pakistani surplus ammo, and military ball produced by Prvi Partizan (PPU).
I started with the PPU ammo, loading a single round in the magazine. My intent with this was simply to see if the gas system worked and if the bolt would lock back on the empty magazine. This worked fine. I then loaded up the magazine with a multiple rounds and it still functioned flawlessly.
I switched to the Pakistani military surplus, and it also ran without problems.
Finally, I tried the Tula steel cased ammo, and had a stuck case on my 9th round. This wasn't exactly unexpected since my AR-15 also won't reliably run steel cased ammo. It mostly has to do with the expansion/contraction characteristics of steel versus brass. Steel won't contract as rapidly as brass after the bullet is fired, and so it has a tendency to grab against the chamber wall. In any event, I hadn't brought out a cleaning rod, so that ended my shooting. After I got back home, I put together a brass cleaning rod and, using a small hammer, was able to dislodge the case after a few taps.
I will, of course, be running more ammo through it--I still have to sight it in--but I was pleased with how it worked even if it choked up on the steel cased ammo.
One of the more surprising things to me was the low felt recoil. On my first shot, I caught myself pushing the rifle barrel down before pulling the trigger and actually hunching up a bit because I really believed that the light weight and lack of padding on the stock was going to make the rifle kick like the proverbial mule. So, after calming myself so I didn't anticipate the recoil, I made that first pull of the trigger and was surprised to find that the kick was about the same as an AKM shooting 7.62x39. I think it was because of the strong buffer spring slowing down the recoil impulse. In any event, because of the low recoil, I am wondering whether to use the muzzle compensator or just attach a simple flash hider or thread protector.
In addition to adding a muzzle device, I have a few odds and ends before I can say the rifle is complete. The handguard is very shiny, so I have ordered a section of Gunskins in A-TAK AUX pattern to cover the handguard to both dull it and camouflage it. Finally, I will need to add a sling attachment point to the front of the handguard. I haven't decided whether to add a weapon light, but I'm leaning against it.
So, in conclusion, I am so far very pleased with the rifle, its ergonomics, and handling. I'm looking forward to sighting in the weapon and giving it more of a workout. I can easily see using this rifle for hunting and plinking and self-defense--in other words, the "all purpose" rifle.
No comments:
Post a Comment