The particular model shown here is an older model, although I don't know the specific date of manufacture. It features the longer barrel and tube magazine, as well as the original feed throat design. When I first obtained the rifle, it was missing the rear sight elevator ramp,
.
I discovered that the rifle also had feeding problems. Although the rifle ejected without trouble, about every other round would misfeed, being pushed up and into the rear of the barrel instead of into the chamber. Initially, I just assumed this was perhaps due to inadequate cleaning. However, after a complete disassembly and cleaning, I still had the same problem. I took the rifle to a gunsmith who, a couple months later, told me the issue was simply one of ammunition. Nevertheless, I still experienced the same feeding problem no matter what type of ammunition I used.
After disassembling the rifle again and paying more attention to how the mechanism worked, I discovered that the screws attaching the action to the receiver had loosened, allowing the feed throat to be forced apart--just enough that it allowed a cartridge to feed at too steep of angle to go into the chamber. After I tightened the screws down, the problem was mostly solved. However, the side plates that hold the action together cannot be tightened down enough to completely eliminate the gap between the pieces of the feed throat.
I decided to replace the feed throat with a newer, one-piece version. Marlin sells a feed throat conversion kit to adapt the older models, although you can also buy the pieces separately. Brownells, Numrich and Midway carry parts--I used Numrich and Midway for the parts for this project.
The installation of a new feed throat into an older Marlin 60 is not a simple drop-in procedure. Besides requiring the firearm's action to be disassembled, there are some minor modifications that must be made to the feed throat. It is also necessary to use a different cartridge lifter and lifter spring/ejector.

 |
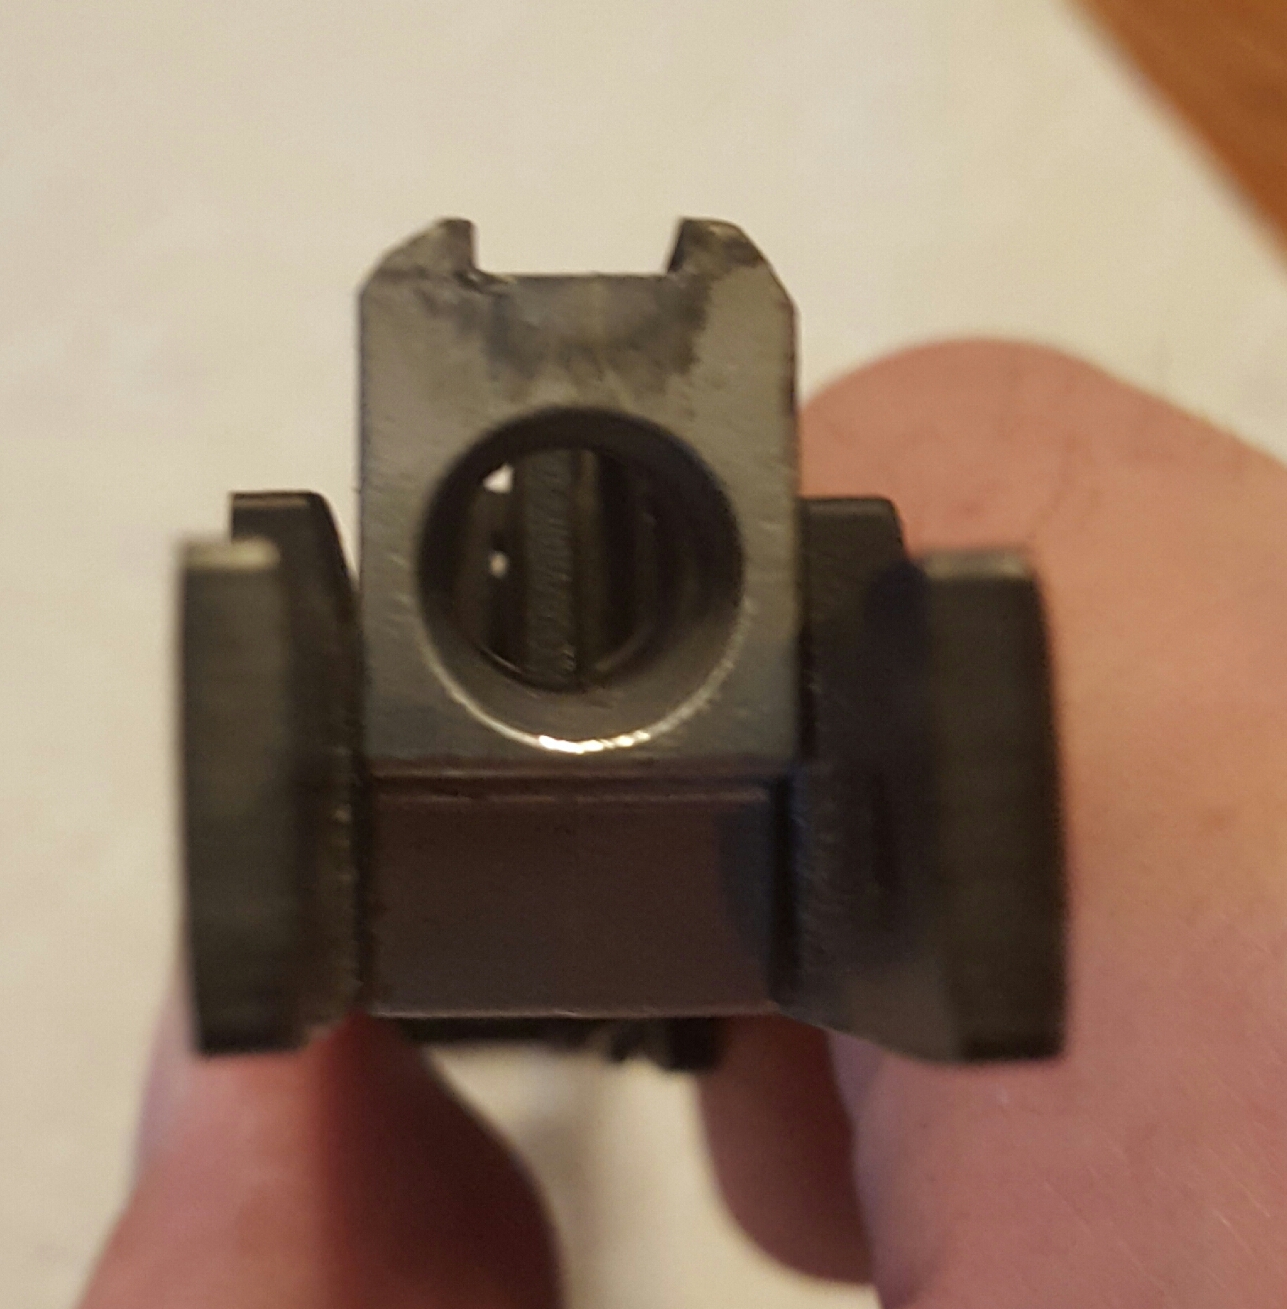
| Front view -- old feed throat on right. Note that the old feed throat is angled on both sides, while the new feed throat is squared off on one side. As described below, the new feed-throat will need to be filed down to be angled on both sides. |
 |
| Back view -- old feet throat on right. You will notice that the old feed throat includes an ejector, while the new one does not. Instead, the new feed throat uses part of the lifter spring to act as the ejector--it fits into the slot visible to the left on new feed throat. |
 |
| Side View -- Old feed throat on top |
You can see some of the differences between the old and new feed throat designs in the photographs above. Of course, one of the differences is the fact that the old feed throat is a two-piece design that is held together with a single rivet. As the photograph of the back of the feed throats illustrates, the two halves can be forced apart slightly (at least in my specimen), which I believe to be the cause of the feeding problem.
Another difference you will note is that the older design has three knobs or studs projecting from the sides, which fit into holes in the side plates of the action. These knobs hold the the feed throat in place. However, the new feed throat has 4 knobs. Obviously, the fourth knob (if you are looking at the feed throat from the front, it is the front-left knob, roughly corresponding to the location of the rivet in the old design) will need to be removed.
In the side view, you can easily see a third major difference, which is that the old feet throat has an integral ejector cast into it. There is no corresponding feature on the new feed throat. Instead, one of the tails of the lifter spring fits into a notch in the back of the feed throat (you can see this in the middle photograph) and projects slightly over the top of the feed throat, thereby serving double duty as the ejector.
Finally, looking at the front view, you will notice that in the old feed throat, both sides of the top of the feed throat are angled. These match up with angles cut in the bottom of the bolt. But on the new feed throat, one side (the left, as viewed from the front) is squared off. This will also have to be shaped with a file to fit into the old bolt.
The instructions below will tell you when to make the modifications to the new feed throat.
Differences Between the Lifters and Springs
There are also differences between the lifters and springs.
 |
| Old Feedthroat, Lifter and Spring |
 |
| New feed throat, lifter and spring |
As you can see from the photographs above, the old cartridge lifter is longer and shaped slightly differently from the new cartridge lifter.
The old cartridge lifter will NOT work with the new feedthroat. Although the old cartridge lifter will fit into the new feedthroat, it will not depress far enough for the bolt to travel freely over the feed throat. You must install a new cartridge lifter.
The springs are also different. On the old spring, the two tails (or arms, if you prefer) are close to the same length. One tail has the end sharply bent to one side, and fits through a hole in the side plate to anchor the spring. The other tail fits underneath the cartridge lifter.
The new spring has very different lengths of tails. The short tail, with the sharply bent hook, actually fits under the cartridge lifter. The other tail fits into a groove at the back of the feed throat, and projects slightly over the top to act as the ejector.
Disassembly and Removal of the Old Feedthroat Parts
After making sure that the firearm is unloaded, turn the firearm over so you can see the bottom of stock and trigger guard, so you can see the screws that hold the receiver and stock together. At least on my particular specimen, the slots of the screws are each different sizes, so you will need at least three screw drivers or screw driver bits with varying widths and
thicknesses of blades. It is easy to mar the screws if you do not use the correct size of screw driver bit.
 |
| Bottom of firearm -- remove the circled screws |
As you can see, there are three screws through the trigger guard (at least in the particular model I own) and larger headed screw forward of the trigger guard. Only the three right-most screws need to be removed.
 |
| Screws removed |
With those three screws removed, the barrel and action should pull away from the stock and trigger/trigger guard assembly.
 |
| Back of Action |
 |
| Front of action |
At the front and back of the action are screws that hold the action to the receiver and barrel assembly. Remove these. As with the other screws, the size of the slots are different, and you will need at least two different sized screw drivers or screw driver bits.
 |
| Screws removed. |
With these screws removed, you should be able to pull the action loose from the receiver/barrel assembly. Be careful as you remove it to pull down and to the rearward to clear the plunger in the tube magazine (or simply remove the plunger completely--i.e., turn and pull out the tube just as if you were loading the firearm). This plunger will be projecting into the hold on the front of the feed throat, and can be damaged or broken if you pull the action straight downward.
 |
Useful tools for disassembly and assembly of the action. Left to right: a small upholstery nail puller,
a straightened paper clip, and an awl. |
Some tools that will be useful are (1) a small upholstery nail puller (or you can use a flat screwdriver with a slot cut into the blade), (2) a paper clip or piece of wire, and (3) an awl or scribe. The nail puller will be used to press the hammer strut bridge (a small plate at the bottom of the hammer strut) and compress the hammer spring. The paper clip will be used to hold the hammer strut bridge in place so you don't have the hammer strut bridge and hammer spring go flying across the room. The awl will be used to remove and install a couple small c-clips.
 |
| Paper clip through a hole at the base of the hammer strut |
Before going further, place the paper clip through a small hole you will see at the base of the hammer strut, as shown above. This will keep you from losing the
hammer strut bridge or hammer spring.
 |
| The two c-clips to be removed |
Next, remove the two c-clips shown above, so you can take off the right hand side plate. (Do not attempt to remove the other side-plate as most of the other parts are connected to that side plate, and it will greatly complicate reassembly).
 |
| Old feed throat, lifter and spring |
With the right side plate removed, the feed throat and lifter will be exposed, and can be easily lifted out.
 |
| Old Lifter Spring. As you can see, one part of the old spring fits into a hole in the side of the action, while the other "arm" fits under the lifter. |
At this point, you will need to grind off the extra knob on the new feed throat. The metal is soft and non-ferrous. So, if you are using a power grinder, be careful as the metal will be removed quickly and without the usual spray of sparks thrown off by steel to warn you when the grinding wheel has contacted the metal.
 |
| New feed throat with knob ground down |
Next, put the new spring on its pin.
 |
| New Spring. The new spring does not fit into the side of the action at all. Instead, the longer "arm" will fit into the groove on the back of the new feed throat to act as the ejector, while the shorter "arm" fits underneath the new lifter. |
Then place the new feed throat into place, and position the long tail of the lifter spring into the groove on the back of the feed throat. With that done, it is time to push the lifter arm into place. The small hole in the lifter goes over the pin to the far left of the photograph, above. Obviously, the front part of the lifter must slide first into the feed throat. I found it easiest to hold the feed throat in place (you can hold it with your hand, or wind a rubber band around it), hook the short tail of the spring into place, and then push the lifter forward and down (at an angle) into the back of the feed throat, and then maneuver it into place into the pin at the rear of the lifter.
 |
| Orientation of the new lifter and spring. Remember, though, that the short "arm" of the spring (to the left in the photograph above) will need to go under the lifter. |
If you have not done so at this point, wind a rubber band around the feed throat to hold it in place.
 |
| New feed throat, lifter and spring in place. You can see the bit of the spring that fits under the lifter above, as well as how the longer arm of the spring fits against the back of the feed throat, and protrudes over the top, to act as the ejector. |
Reassembly
I found the reassembly after this point to be the trickiest part, simply because of the difficulty of compressing the hammer spring so you can fit the tabs on each side of the hammer strut bridge into their respective holes.
Although you may find an easier method, this is what I did: Using the upholstery nail remover, place it so the strut will fit up through the cut in the blade, and push it (compressing the hammer spring) until you can fit the tab into its hole in the left side plate. Then put the right side plate over the right tab of the hammer strut bridge, and, holding it tightly together, shift the side plate around until you can fit it over the other pins that hold it in place. If your experience is like mine, you probably are best doing this step away from children because you will likely be cursing a lot. Be mindful that the paper clip stays in its hole, or you may see the hammer strut bridge and hammer spring fly across the room!
Once the side plate is on, use a second rubber band to hold it in place, and push the two c-clips into place. You can then unwind the second rubber band. You will probably just have to cut the first rubber band loose from around the feed throat. Finally, remove the paper clip.
 |
| Back together! |
If you have not done so previously, it is helpful at this point to remove the bolt from the receiver to help with the final fitting and shaping of the feed throat. Putting the bolt into its rearmost position over the action, you will notice that the bolt will not ride over the new feed throat. This is, as I mentioned earlier, because one side of the feed throat is squared off rather than angled. Look at the bolt and feed ramp from the front, and you will be able to see what I'm talking about.
At this point, you will need to take a file and shape an angle into the side of the feed throat. Again, the metal is soft and easily removed. So stop often and check against the bolt. Don't take off too much material. When it is done, the bolt should ride over the feed throat without lifting up.
You do not need to do any shaping of the rear of the feed throat or the side that is already angled.
One thing I found is that the lifter spring/extractor scraped and caught against the bolt. I had to bend the spring down slightly so it wasn't angled so steeply. However, check your bolt before you do this. You don't want to end up having to order a new spring.
Once the bolt rides fairly smooth, you can put the bolt back into place and finish your reassembly. Reassembly from this point forward is the opposite of the disassembly. Again, be careful of the plunger in the tube magazine.
Further Thoughts
As some of you may know,
I had previously written up this project, and wound up having ejection problems. My error in my previous attempt was thinking that I could mix parts, using the new feed throat but the old spring and lifter. As I mentioned, the old lifter does not depress far enough to let the bolt clear. However, it was not immediately obvious to me that this was the problem. So, I ground too much off the new feed throat, including on the back of it. By the time I figured out what was wrong, I had removed the cut in the back of the feed throat for the lifter spring/ejector.
Of course, I didn't know what problems that was going to cause because I didn't realize that the spring also acted as the ejector. I simply replaced the old lifter with a new lifter, and used the old spring. As I reported in my earlier post, when I took the rifle out to test fire, I had no more feeding issues, but it now wouldn't eject. Looking into the issue further was when I realized that the change in design of the feed throat included a change in the ejector. So, the end result is that I had to order a new feed throat and do the whole project over again.
Currently, I have tested the feeding by hand, but I haven't had an opportunity to go out shooting. I will report on any issues that I have. However, the ejection seemed pretty positive when operating the bolt by hand, so I'm confident that the ejection issues are solved. And since the replacement of the feed throat last summer had solved the feeding problems, I anticipate that those issues are also resolved.
Obviously, ordering a new feed throat kit (the feed throat, lifter, and spring) is a significant cost relative to the cost of a used Marlin 60. So my hope is to see if there is some way to fix the old feed throat to improve reliability. That will probably be a project for this coming summer.
If you have any experiences or thoughts you would like to relate, please comment.
Update (3/2/2015): I took the rifle out shooting this past weekend and put about 100 rounds of a couple different brands of standard .22 lead round nose through it without any failures to feed or extract. So, I consider the project a success.
Update (6/17/2015): Last Friday, a reader emailed asking when my Marlin Model 60 was manufactured. Interesting question. I knew that the particular model I used in my article dated from before the mid-1970's, but not the particular year of manufacture. In making a quick search, I came across the web-page for a company calling itself the
Antique and Collectible Firearms and Militaria Headquarters which had several resources for determining manufacture dates for various manufacturers, including
Marlin. It stated that, for Marlin firearms made between 1969 and 1990, "[t]he first two digits of the serial number designate the year of manufacture, either as the last two digits of the year (in 1969-71) or as a number code (1971 and later)." According to my reader, the system for 1971 and later was to subtract the first two digits of the serial number from 100 and that would give you the year (in a 2-digit format). My particular model was made in 1970.
Update (9/9/2015): I expanded the descriptions as to a few of the photographs to give more of an explanation of the differences between the old feed throat and spring, and the new feed throat and spring.
Update (11/30/2015): I had the rifle with me this past weekend, shooting in temperatures between 20 and 25 degrees Fahrenheit. Out of approximately 50 rounds, I had two failures to eject ("smokestacks") and one where the bolt cycled far enough to eject the spent casing, but not enough to pick up a new round. Considering the temperatures, and that the gun had been sitting in the cold while I used other weapons, I thought it did pretty well.
Update (10/15/2016): I had a request asking for additional photos of the feed throat after the shaping allowing it to use the old bolt. So, without further ado:
Update (8/11/2018): I saw on a forum that cited to this article that there were complaints about the photograph showing the fully assembled rifle at the top of this article. Accordingly, I have replaced it with a new photograph that better shows the rifle.


Let me know any info other than the above, I have older model 60 also ,same problem on ejection, love shooting this gun. Thanks Don Paul(amparo111@hotmail.com)
ReplyDeleteThanks for the comment. It reminded me that I needed to get back to this project. I have another part on the way which I hope to have in a couple weeks, and I hope to have an update on this post within a couple of weeks after that.
DeleteThank you so much for posting this - it is just what I was looking for. I have a model 99M1 manufactured in 1967 (no serial number) and it has feeding issues and a worn feed throat. It is a joy to shoot and even fired with the original recoil buffer in tatters and the feed-tube follower broken in half; just not reliably. I fixed the other problems and have concluded the feed throat needs replacing. Glad to see I can do it relatively easily and, most importantly, without having to replace the bold with a newer one. Will dust off my Dremel and hand files!
ReplyDeleteI'll keep an eye on the comments in case you have any questions, or you can email me. Good luck.
DeleteThank you for the great tutorial. It has really been helpful. I've got everything back together as it should, but the bolt doesn't seem to go forward as easily as it used to. Sometimes I have to nudge it forward in order to close all the way. To me, it seems like the lifter/ejector spring is too stiff and the bolt is getting caught on the ramp. It takes a lot of force to push the lifter down...a lot more than before.
ReplyDeleteI found that in troubleshooting, it was best to have removed the action and the bolt, and with the bolt in one hand, manually ran it over the action so I could not only see but feel where there were some problems. So try that.
DeleteI'm assuming you are using all new parts (new lifter, new spring, new feed throat). As I noted in my post, my initial mistake was thinking that I could mix old with new parts, but the designs had changed too much between the old version and the new for that to work. That aside, there are two possibilities that come to mind:
First, whether the bolt is clearing the new feed throat on the side that had to be reshaped (see the photo showing the front view of the new and old feed throats, and you'll see how the new feed throat is square on the left side, whereas the old is angled). After I had made my first attempt, I had to go back with a hand file and grind it a slightly steeper angle before it cleared easily. So you might check that--just make sure that you don't take too much off.
The second possibility is that the ejector portion of the ejector/lifter spring is poking up a bit and rubbing/scraping on the bottom of the bolt. I had to (very slightly) bend mine down a bit and filed off a bit of a burr on the end of the spring.
Let me know if any of that works. Thanks.
Thanks for the write up,I will be trying this soon. I just took my model 60 out of a 30 some year hibernation. I put an ATI fiberforce stock on it. I'm having feed and ejection problems even after several cleanings.
ReplyDeleteMy feed throat problem was clearly due to the split piece design, with the two sides being forced apart when it fed. However, in backtracking a link to this article, it led me to a discussion at Rimfire Central that suggested a couple less radical corrective measures you might want to try first: (i) trying different ammo (which didn't work for me); and (ii) polishing the feed ramp (I didn't try this, but it probably wouldn't have worked with my situation). Anyway, something to think about. The Rimfire forum thread was at: http://www.rimfirecentral.com/forums/showthread.php?t=578871
DeleteAnyway, thanks for reading.
This comment has been removed by the author.
DeleteI finally got around to ordering the new parts and put them in. The write up really helped especially the rubber band trick. Now I need to get to the range to try out.
DeleteLet us know how it works out.
DeleteGreat write up, Thanks! I just used this as a guide to replace the 2 piece with an updated 1 piece feed throat in my 1980 Glenfield Marlin 60. I ordered the kit from Brownells. When I disassembled the rifle, I learned that someone had actually replaced the bolt which had a square edge and an angled edge while the feed throat had 2 angled surfaces. Also the lifter spring included the ejector and was all tweaked. I guess it's possible that Marlin did that from the factory since I understand that 1980 was the year that they changed that set up, but someone had definitely been inside that rifle.... I didn't need to do anything to the feed throat to get it to slide on the bolt correctly. I did have to slightly grind down the ear of the lifter spring because it was rubbing on the inside of the side plate. Regarding the trigger spring - I used the paper clip as suggested, however I saved a lot of headache by releasing the hammer so there wasn't so much pressure on the hammer spring. Put a finger on the hammer, press the tab that the trigger hits and let the hammer down. When reassembling, it's easy to get the hammer spring pin to line up with the holes on the side plates. Also I didn't see a need for the rubber bands - hold everything together with your fingers and put the side plate back on - the lifter spring can be set into place with a screwdriver after assembling the action between the side plates. I did need to tweak the ejector side of the lifter spring to keep it from dragging on the bolt. I'll try it tomorrow!
ReplyDeleteThanks again
Mike
Thanks for the comment and added suggestions.
DeleteHow much differences are there in the springs? I have the new throat and can get the lifter but can't find newer style spring.
ReplyDeleteThey are significantly different in shape because the newer spring also serves as the ejector. If you look at the 5th and 6th photos from the top, you can see the difference. Numrich currently (8/31/2015) has the spring in stock, although they want $12.05 for it, which is almost twice what Midway is charging (but Midway is out of stock). The link for the part at Numrich is:
Deletehttps://www.gunpartscorp.com/Products/443920C.htm
I have a 1971 Marlin M60 that was given to me. The problem being was jamming so I replaced with the updated version feed throat, lifter spring and bar. Assembly went together as outlined in your post. Problem now being the assembly does not fit properly when re-installing and the holes do not line up easily. Not sure at this point what to do or what other changes I need to make. I would appreciate any input you might have.
ReplyDeleteNot having a picture or good idea of what exactly is occurring, I would suggest looking at the shaping of the new feed throat. The old feed throat had a slight angle on each side of the top to match the shape of the inside of the bolt. The new feed throat is squared on one side, which needs to be filed down in order to allow the bolt to slide over it. (See the photos comparing the old and new feed throats--front view--above).
DeleteThanks for the detailed write up. I have a 1974 Model 60 that has a hybrid of the old style two piece feed throat. It is two pieces, does not have the internal ejector, and has the slot for a new style spring. It uses the old style lifter. I bought it damaged, broken trigger housing, broken hammer, and someone attempted to remove the lifter spring by unrolling it with pliers. After replacing the trigger group, hammer, and old style spring I found it would not eject. Now I get to buy a new style spring and install it. I enjoy projects returning this firearm to functional capacity will be enjoyable. I think all the oddballs and misfits find there way to my door. Your write and up was beneficial.
ReplyDeleteThanks for the comments. Restoring a gun can be both very frustrating during execution, but very fulfilling when everything works like it is supposed to. Good luck on your project.
DeleteYou wouldn't have a video on this by chance would you
ReplyDeleteOr could I contact u have a few questions I don't see here
Sorry, no video. But you can post questions, or email me (see the Contact Me tab).
DeleteThe converted 60 went together like stated but every 5 or 6 would hang up, found out that it was the stock screw going it too far into the feed tube, 1978 model the wood was sunk in, just added a washer to it and problem solved could not have done this with out your write up THANKS !
ReplyDeleteGlad to hear the article helped. Thanks for the comment.
DeleteI have a feed throat from a 1983 Marlin 60 that has only 3 pins, is made identical to the new four pin feed throat on the top (square on the right side). Another difference is there is no provision for the LSHO feature found on the new ones. So, Marlin has produced at least four different versions of the feed throat that I have seen.
ReplyDeletefound out i also have a split feed ramp, square on the right with a new style spring. i guess i will order a new style spring. old spring was messed up enough to not let the bolt slide fast enough so i cut it off shorter not knowing it was part of the ejector. GLENFIELD
ReplyDeleteGood luck. Sounds like you have some variant made after the older model I have. It would be interesting to see pictures of the parts.
DeleteI'm curious, would you have to had to file the new feed throat if you purchased the "new breechbolt" with the "new conversion kit"? Looking at Numrich the conversion kit is approximately $30 and the breechbolt is about $62. Also, can you post a top side pic of the feed throat you filed? not the extra knob removal, but the top part. Thanks, Dave
ReplyDeleteI don't know because some of the newer breach bolts use a different width cocking handle, and I don't what was available at the time. I see that Numrich has parts available for older models of the Model 60, so perhaps I could have purchased a replacement feed throat that was correct for my model. I will try to get some photos up this coming weekend.
DeleteThank you! Great write up by the way. Everywhere I look, including Numrich, all the Old Style parts are sold out. Then I stumbled upon your post. I checked Numrich again, and saw the conversion kit. I thought I read on a Numrich forum that if you got the conversion kit, you had to use the new style bolt, but it did not say exactly why. So if I can "file" a New feedthroat, and it work, without having to replace the bolt, which there is nothing wrong with anyway, that would be great. Technically, the only thing wrong with my Glenfield 60 (mfg 1975) is I broke part of the feedthroat during cleaning, as you know, that metal is soft. Anyway, thanks again, Dave
DeleteSome more photos up. Hopefully they are of assistance.
DeleteI have read this post with great interest. The very first gun I owned is a Marlin 99 M-1. After having not seen it for years, I tracked it down and found it in my sister's garage, where it was in decent shape. I cleaned it and tried it out, and it works ok, but doesn't feed well, jamming about 3 or 4 times, or more, in 10. It does need a new buffer. I also think it may benefit from a new feed throat. As has been noted, the feed throat conversion kit, is available for around $30.00, but it is indicated that on older models a new style bolt and charging handle, are also required, which adds another $70 or so to the cost. I really want to get this gun back into working order, but if I can do it for $30 instead of $100 (plus the cost of the buffer), all the better.
ReplyDeleteWas the cost of the bolt, the reason you modified the feed throat? Are there any other reasons you can think of, having done this, besides cost vs. labor, for trying your method instead of buying a new bolt? Just curious, if you had it to do again, if you would do it this way, or just spend another $70 and buy the replacement bolt.
When I did my project, I wasn't seeing parts for sale for the older models, which was a factor. But if I had to do it over, I still think I would go the same route. The reason being that the two piece design for the feed throat was an inherent flaw.
DeleteI agree about the old two-piece feed throat having an inherent flaw. I guess what I was trying to ask, is faced with replacing the feed throat again, would you buy the $30 feed throat, and then file it down to make it work with your current (old style bolt), or would you just spend an additional $70 and get the recommended new bolt and charging handle, so it would work without having to file it. So basically was your project easy enough that it was worth undertaking the filing down of the feed throat to fit your old bolt vs. spending another $70 and not filing it to fit the old bolt.
DeleteThe hardest part of the project is the reassembly of the action, which you would have to do whether or not you replaced the bolt. The filing of the angle onto the feed throat is easy--it can be done with a coarse hand file, checking it against the bolt as you go along--and so, yes, I would opt for filing the new feed throat to fit the old bolt over buying the new bolt.
DeleteCan't find the new one piece feed throat anywhere. I have the new extractor and spring. Anyone know where I can get the one piece feed throat?
ReplyDeletehttps://www.brownells.com/rifle-parts/receiver-parts/magazine-parts/magazine-guides-amp-inserts/feed-throat-prod8652.aspx
DeleteThanks! It's ordered and on the way. I'm pretty excited to get my 60 back in action. Appreciate all the valuable insights shared.
ReplyDeleteThe receiver on my 60 is scratched and worn. What paint/finish should be used to best restore it? Thanks
ReplyDeleteI haven't refinished mine, so I don't know for sure. If you just want to touch up a few scratches, you could try a Birchwood-casey touch up pen for black paint:
Deletehttps://www.amazon.com/Birchwood-Casey-Super-Black-Touch/dp/B00BGH0Y0W
If you are going to recoat the whole thing, you probably will need to use something like Duracoat, Alumi-hyde,or cerekote.
does anyone know about putting the new style barrel into the old model receiver thanks
ReplyDeleteThat is beyond the scope of my project, so I can't help you. Maybe another reader can chime in?
DeleteI've got my late grandfather's 20* series Glenfield 75C with a squirrel stock (cut down to fit his small and scrappy stature). The serial indicates that this is a circa 1980 rifle and it does have the older split style feed throat. I have had intermittent feed issues that were hard for me to pin down til I read this. What I'm seeing is mainly the first round will nose high and left, missing the chamber. It is in fantastic shape otherwise and I want to give this rifle to my son, but I see I'll need to invest a little work in it first. Thanks so much for sharing!
ReplyDeleteUSN RET, I too had feed problems with a Mod 99C. Solved mine going a different route, disassembled trigger group, removed feed ramp, mounted it in my vertical mll, drilled out the potmetal rivets from swaged side. Drilled, and counter sunk and tapped 4-40 flat head socket head screws, secured with lock-tite. Flush on both sides and reassembled trigger group and rifle, went out and fired a 100 rounds without a fail to feed. Still a pleasure to shoot!!!!
ReplyDeleteAwesome. Had a time finding the parts, but once I did- the whole project took me maybe 45 minutes. My 1974 Marlin 60 runs like a top now, extremely satisfying to see it come back from the dead like that. Thanks for the write-up!
ReplyDeleteGlad it helped!
DeleteWhere did you get your parts? I feel like I've looked everywhere.
DeleteI wonder if there are any upgrade kits left in the world? I took my Marlin Glenfield Model 60 to a gunsmith 12 years ago with a newer model feed throat (but no spring or lifter arm) and he told me there was no option to make the newer one to work and just put my old one back in and replaced 2 screws and charged me $120. I have since been working on a modified design of the original printed in carbon fiber PLA. I feel like I am getting close to a working design as the rounds will now feed when cycled manually, but angle jam when fired. Regardless of if I get it working, I would like to have a conversion kit if I can find one. This is the gun I grew up shooting as a young boy and I would like my kids to be able to learn on it. I've definitely put more in it than it is worth from a practical perspective.
ReplyDeleteNumrich has the newer lifter and spring (https://www.gunpartscorp.com/gun-manufacturer/marlinglenfield/rifles-marlin/60-new-model).
DeleteI did see those, but I couldn't tell if they were the ones needed to do the upgrade. I haven't see the new throat available. Thanks for your help.
ReplyDeleteGreat tip using the rubber band as a place holder! Definitely include locking the bolt back before removing and installing the side plate assembly if not the ejector can get smashed down. Also tuning the ejector spring to the penny/nickel trick is a must too. Arrowdodger has great videos tuning as well. Excellent article!
ReplyDeleteHave you ever run across a 3-Lug One-Piece Feed-Throat? I recently aquired a 75C that is having feed issues. it is the Old Style 2-Piece Feed Throat (1977 I think). I thing I may have found a souce for a Feed Throat that does not have a center seam and only has 3 Lugs.
ReplyDeleteNo. I was not aware of any such option. It would make the conversion easier. If you do locate a source, please post it in a comment.
Delete