Showing posts with label Tools. Show all posts

Monday, December 22, 2025

The Realist: NexTool Multitool Review

 A guest post from the Realist, who writes:

Disclaimer: All products mentioned in this article were purchased by myself. I did not receive free samples, evaluation models, or other compensation from any manufacturer or retailer. I have no formal relationship with any manufacturer or retailer mentioned in this article - I have only been an arms-length customer. All brand names and product names used in this review are the trade names, service marks, trademarks, or registered trademarks of their respective owners. Further, this article reflects my unique circumstances and subjective opinions with regard to performance and other characteristics of the products discussed. Your mileage may vary.

The NexTool is the size of a credit card.

    A few weeks ago, I saw a short YouTube video (https://www.youtube.com/watch?v=XRtjAwL1Upc) review of the NexTool (https://nextoolstore.com/) credit card sized multitool. It was described as a "Wallet Multi Tool." Folded, it was shown to be roughly the dimensions of a credit card, and in the video it appeared to be fairly thin.

    I'm a sucker for an interesting multitool design, so I ordered one from Amazon (https://www.amazon.com/dp/B0DN1HJ2SK). It cost $35 and shipped from Amazon, with delivery taking a couple of weeks.

    Folded, the multitool is 51.7 millimeters (2.0 inches) wide and 85.1 millimeters (3.4 inches) long. It weights approximately 94 grams (3.3 ounces). And, it comes with a fake leather pouch in which to store the multitool if desired.


The NexTool on top of its pouch,unfolded to show the
various tools.

     The various tools in the multitool consist of:

  • Pliars
  • Wire cutter
  • Wire crimper (back side of the pliar jaws)
  • Straight and Phillips screw drivers
  • Hex nut wrenches in 3, 4, 5.5, 6, 7, and 8 millimeters
  • Bicycle spoke wrench
  • Bottle opener
  • Wire stripper
  • Box opener
  • Scraper
  • 5 centimeter ruler
  • Knife

    The knife looks like it has a tanto blade, but the kissaki (angled tip) of the blade is dull. It is already beveled and could be sharpened if desired. The knife edge itself arrived fairly dull. The blade does not lock in the open position.

    The other blade, from which the spoke wrench, bottle opener, wire stripper, box cutter, scraper, and ruler is formed, uses a liner-lock style mechanism to lock it open.

    The two screwdriver tips are formed on the corners of the members forming the handles when the multitool is closed. They are better than nothing, but are far less functional than the screwdrivers found on a traditional multitool.

    The multitool ended up being thicker than anticipated, with the various hinges and pivots being the thickest elements of its construction. The main pivot for the plier jaws was 7 millimeters (0.28 inches) thick. The plier jaws themselves are 3 millimeters (0.12 inches) thick.

    Conceptually, the Nextool multitool is a great idea, but poorly executed. I really wanted to like this multitool, but the thick hinges and pivots were a serious design deficiency for something that is supposed to be thin. The next significant deficiency was that the knife blade does not lock open. Another deficiency was the underwhelming screwdriver implementation.

    It seems to me that this multitool is a niche product for those who may have specialized requirements for a small lightweight thin-ish multitool.

    The NexTool multitool is definitely unique, but unless you have a specific need for a multitool like this, I'd give it a pass.

Sunday, December 14, 2025

Gun & Prepping News #59

  Just some gun and prepping related links that I thought interesting or useful:  

     What we call appendix carry today is something that would be familiar to pistoleros going back dozens, even hundreds, of years. In the early days of the semi-automatic, a style of firearm carry commonly referred to today as “Mexican carry” involved sticking an unholstered handgun behind the waist belt at the front of the body, where it would be quickly accessible by a shooter’s strong hand. It was a popular option for revolvers, too, as the butt of the gun could hook onto the belt. Casting aside, for a second, the safety considerations of carrying an unholstered gun this way, an obvious benefit was the immediate accessibility of the firearm, as well as the concealment benefits.

    Going back further, daguerreotype images from the Civil War show troopers, soldiers and guerillas with revolvers stashed into the belt at the front of the body, and illustrations going back even further show men with long-barreled flintlock pistols having the gun situated at the front of the body, albeit in more of a cross-draw position to accommodate the 9" to 12" barrels on such guns. Clearly, there were benefits even then to locating your sidearm on the front portion of the body.
  

Lindy Beige did a video about holsters back in the 1800s and why they would use a cross-draw method of carry. And it was because people actually wore slacks that went up to the waist, no riding around the hips. At that height, it is very difficult to draw from a holster on the same side as your gun hand, necessitating cross body draw if you want any speed.  

This guide provides a comprehensive overview of essential gear and equipment for new gun owners who want to carry a pistol for self-defense. While we emphasize the importance of professional firearms training and safety, this guide focuses specifically on holster selection, spare magazines, and other gear to enhance your concealed carry journey. We’ll explore how to choose the right holster for your needs, the importance of dry fire practice, and how to select quality gear that integrates seamlessly with your everyday wardrobe. Remember, responsible gun ownership starts with safety and consistent training, but having the right gear can significantly enhance your confidence and preparedness. 

  • "Bolt-Action Versus ARs for Hunting: Choosing the Best One for You"--Guns & Ammo. Setting out the pros and cons of each for hunting. As the author notes, "[t]he biggest advantage to hunting with an AR, however, is higher capacity and the ability to make faster follow-up shots." While the author discusses some potential advantages that the bolt action might have in accuracy and shorter lock time, "[t]he real benefit of bolt-actions is their simplicity." Meaning, easier in theory to maintain and troubleshoot. Other advantages he lists for the bolt action are a greater variety of cartridges, and can (and I would emphasize the "can") be built lighter. But you can probably get almost as light using magnesium receivers from ROAM and using other lightweight components. ROAM, for instance, sells a sub-6 lbs. AR10, and I built an AR10 using their receivers that was, without scope, 6 lbs. 2 oz. I could have gotten it to 6 lbs. if I had used a pencil profile barrel. 
  • "The Rimfire Report: Tips for Building an Off-Season Rimfire Trainer"--The Firearm Blog.  The author notes the importance of practice for successful competition or hunting, but that shooting the centerfire ammunition can be expensive. His suggestion is to use a rimfire rifle that mirrors (or, at least, mimics) your hunting or competition rifle. His favorite is the Bergara B‑14R which, he states, is "a customizable rifle that closely mimics a Bergara/700‑pattern centerfire in length, weight, stock shape, and magazine form factor," and "allows hard bolt cycling, safety manipulation, and position work that feels almost identical to their big‑game rig due to the sheer weight of the rifle’s barreled action alone...." But it comes at a steep price. He lists some other options are less expensive (relative to the Bergara) but still will cost as much as a good hunting rifle. 
  • This one might work as an off-season trainer at a much lower price point: "The Savage B Series FV-SR .22 Magnum"--The Truth About Guns. This one is a bolt action rifle that uses a 10-round rotary magazine and has a threaded barrel. The author notes that for small game hunting, the .22 Magnum falls into a nice middle ground between the .22 LR and a centerfire cartridge like the .223. He also discusses the silencer (sound suppressor) for it. 
  • "One Cool Custom Bearcat"--Guns Magazine. The author praises the engraving and case coloring abilities of Tyler Gun Works. 
  • "The VTAC 1-5 Drill | Dynamic Rifle Shooting"--Ammo Land.  This drill was developed by Kyle Lamb. It uses 3 targets and its intended to practice close in shooting (the author of the article notes that it could, for that reason, also be used for handguns).
  • "Glock Gen 6 First Look: Evolution, Not Revolution"--Guns America. Yet another review of the Glock Gen 6. Key bit:

     The simplest way to describe the shooting experience is this. It shoots like a Glock.

    Recoil impulse, sight tracking, and trigger behavior all feel familiar to anyone who has ever shot any generation of Glock. The improvements come from how the gun stays planted in your hands. The undercut, beavertail, improved texture, and slide stop fence make it easier to grip the gun correctly without fighting traditional Glock quirks. These are valid improvements.

    The flat trigger offers consistent finger placement but does not change the fundamental nature of the trigger itself.
  

  • "Inglis P-35B Hi-Power Review: Modern Take on Browning’s 9mm Legend"--The Truth About Guns. Notwithstanding the Inglis name, this is built in Turkey like so many other reproductions. It has some updates over the historical Hi-Power including a replaceable front sight and ambidextrous safety. It also lacks the magazine safety. 
  • "The EDC Tool Roll: 711L Mini Ratchet Wrench"--Jerking The Trigger. This is a tiny ratcheting offset screwdriver that appears designed to take standard screwdriver bits. This also means that with a small adapter it can be used as a small socket wrench. It can also fit a bit into the end of the handle so it can be used like a standard screwdriver. The author says that it is about 2 inches long.  It looks to be selling for $25 on Amazon. The Amazon link in the article is dead, but the one I provided sees to be to the same product. 
  • "Testing Your Bug Out Bag – Would Yours Survive the First 48 Hours?"--Modern Survival Blog. The gist of the article is that if you can't grab your bug out back and successfully camp for two or three days with it, you have some serious problems with your kit that you need to fix. The author will set up a testing weekend, then comes up with a scenario that would explain why they have to abandon vehicles and continue on foot. He shares his experience on one of these tests with his girlfriend and family. 
  • "15 Pioneer Recipes That Still Taste Great"--Urban Survival Site. The author notes:

 Pioneers relied a great deal on Dutch ovens to cook their meals on the trail. Recipes didn't involve specific temperatures. Rather, it was just a matter of putting ingredients into the Dutch oven and letting it cook over a fire. [Ed: that is, over coals]

One gallon will last about 256 hours. If you burned 6 hours a day, one gallon of lamp oil would last you about 42 days (for example).  
 
He says that lamp oil will not go bad, and the hurricane lamps can also burn vegetable oil (even if rancid) and can also used citronella oil (which can be handy for keeping away insects). He has other advice wicks, safety, and more, so be sure to read the whole thing.  

Wednesday, August 17, 2022

The Realist: CountryComm Titanium wrenches

Editor's Note: A hearty welcome to another guest post by The Realist.

The CountryComm 4-inch adjustable wrench, weighing 24 grams
(top), and the 4-inch forged steel wrench I have been carrying as part of my EDC
for many years, weighing 40 grams (bottom).

    Disclaimer: All products mentioned in this article were purchased by myself. I did not receive samples, evaluation models, or other compensation from any manufacturer or retailer. I have no formal relationship with any manufacturer or retailer mentioned in this article - I have only been an arms-length customer. All brand names and product names used in this review are the trade names, service marks, trademarks, or registered trademarks of their respective owners. This article reflects my unique circumstances and subjective opinions with regard to performance and other characteristics of the products being discussed. Your mileage may vary.

    If you are into emergency preparedness, I'm sure you have heard of CountryComm, a company that sells many interesting gadgets. Recently, I discovered that they were selling titanium adjustable ("Crescent") wrenches. I initially purchased their 4-inch titanium adjustable wrench (https://countycomm.com/products/adjustable-wrench-titanium-4-inch-nsn-pending). Liking what I saw, I subsequently purchased their 8-inch titanium adjustable wrench
(https://countycomm.com/products/8-inch-titanium-adjustable-wrench-nsn-pending).They also sell a 6-inch titanium adjustable wrench (https://countycomm.com/products/adjustable-wrench-titanium-6-inch-nsn-pending).

    For several years, I have been searching for a light-weight adjustable wrench that could go into my emergency get-home bag. Some may argue with my desire to have a wrench that large in my get-home bag, but I have carried a 4-inch adjustable wrench on my key chain since I was in drivers education in high school - a long time ago. I have used that wrench innumerable times to perform various tasks. It has been almost as useful as a pocket knife. Seeking a larger adjustable wrench reflects my desire to overcome some of the limitations I have encountered with the four-inch wrench.

    CountryComm says their wrenches are made from grade 4 titanium. Grade 4 titanium has excellent corrosion resistance, and is commonly used in aerospace, industrial and medical applications where high strength is required. (https://continentalsteel.com/titanium/grades/cp1-grade-4/) CountryComm also says their titanium wrenches are machined from a solid billet of titanium. My careful examination of the wrenches indicates that is true. While the wrenches are well finished, with a matte grey appearance, there are many little details indicating they were indeed machined, with the outside edges being laser cut.

    The wrenches are completely non-magnetic. Even the pin that holds the thumb screw in place is non-magnetic, and it looks to also be titanium.

    The fit and finish of the wrenches is excellent. I see none of the minor/cosmetic defects I see with traditional forged steel wrenches. My only complaint is that the moving jaw on each wrench is a little looser than I like. However, given the overall excellent fit and finish, the looseness of the jaw is probably by design. A loose jaw is less likely to jam or bind with dirt or other crud during normal use.

    The 4-inch titanium wrench weighs 24 grams (0.85 ounces), and the jaws open to 14.03 mm (0.55 inches). In comparison, the 4-inch forged steel wrench I carry on my key chain weighs 40 grams (1.4 ounces), and its jaws open to 14.67 mm (0.58 inches - a little larger than a 9/16 inch bolt).

    The 8-inch titanium wrench weighs 130 grams (4.6 ounces), and the jaws open to 28.81 mm (1.13 inches). In comparison, the traditional forged steel 8-inch adjustable wrenches I have weigh from 200 to 315 grams (7.1 to 11.1 ounces), and the jaws open from 24.9 to 33.0 mm (0.98 to 1.30 inches).

    These titanium wrenches are not for everybody given their price. At the time of this writing, the 4-inch wrench sells for $64.95, the 6-inch wrench sells for $119.00, and the 8-inch wrench sells for $174.95. However, CountryComm frequently has discount codes available that can be applied to take a little bit of the pain out of the price.


The CountryComm 8-inch adjustable wrench, weighing 130
grams (top), and the 8-inch Lobster forged steel adjustable wrench, weighing 175
grams (bottom).

Lighter Weight Affordable Alternatives

    If you feel $175 is a little much for one wrench, but you like the idea of a reduced weight wrench, there is a forged steel Japanese adjustable wrench that weighs 175 grams (6.17 ounces) - 45 grams more than the 8-inch titanium wrench. This wrench is the Lobster UM30X available at the time of this writing from Amazon for $21.39 (https://www.amazon.com/dp/B00762IKEI). The Lobster wrench has a thinner profile than most forged steel wrenches combined with a skeletonized handle to achieve its reduced weight. The one downside of this wrench is that the jaws cannot close completely - no closer than 6 mm (0.24 inches). This may not be a problem if you happen to put a 4-inch wrench on your key chain. The jaws open to a maximum of 31.3 mm (1.23 inches). For the record, this wrench is very high quality - much better quality than the name-brand wrenches sold at the big-box stores.

    If you shop carefully, you should be able to find an 8-inch forged steel wrench weighing 200-220 grams. The defining characteristic of the lighter weight wrenches is a thinner handle.

    Manufacturers have started making the handles thicker on many of their wrenches, which dramatically increases the weight. For example, the current made-in-China Craftsman 8-inch adjustable wrench weighs 290 grams (10.2 ounces), compared to 200 grams (7.1 ounces) for a 1980s vintage 8-inch made-in-USA Craftsman wrench.

Conclusion

    I am constantly amazed by the light weight characteristics of titanium items. These wrenches are no different - amazingly light weight.

    If you live or work in an urban or suburban environment, a light weight wrench might be a worthwhile addition to your get-home-bag or EDC gear. I have carried a 4-inch wrench for many years, and have found it to be extraordinarily useful. The limitation of the 4-inch adjustable wrench is that its jaws do not open much beyond a half-inch. It is my opinion that an 8-inch adjustable wrench, whose jaws can open to over an inch, adds to my ability to improvise or fix things in an emergency situation. Titanium and reasonably light weight forged steel wrench options exist and should be considered.

    Note: The manufacturers' specifications are generally more conservative than the measurements taken from my samples. The one exception I have encountered is the weight of the Lobster wrench, with my sample being 5 grams heavier than the manufacturer's specification.

Monday, December 20, 2021

The Realist: Adhesives for Home and Automobile Repair

  This is the fourth in a series by the Realist on tools for the prepper. You can find Part 1, about common hand tools for home repair, here; Part 2, "Tools for Diagnosing and Repairing Electrical and Electronic Problem" here; and Part 3, "Specialty Tools for Home and Automobile Repair" hereThe Realist writes:

Disclaimer: All products mentioned in this article were purchased by myself. I did not receive samples, evaluation models, or other compensation from any manufacturer or retailer. I have no formal relationship with any manufacturer or retailer mentioned in this article - I have only been an arms-length customer. All brand names and product names used in this review are the trade names,service marks, trademarks, or registered trademarks of their respective owners. I am not a licensed or certified tradesman. Further, this article reflects my unique circumstances and subjective opinions with regard to performance and other characteristics of the products being discussed. Your mileage may vary.

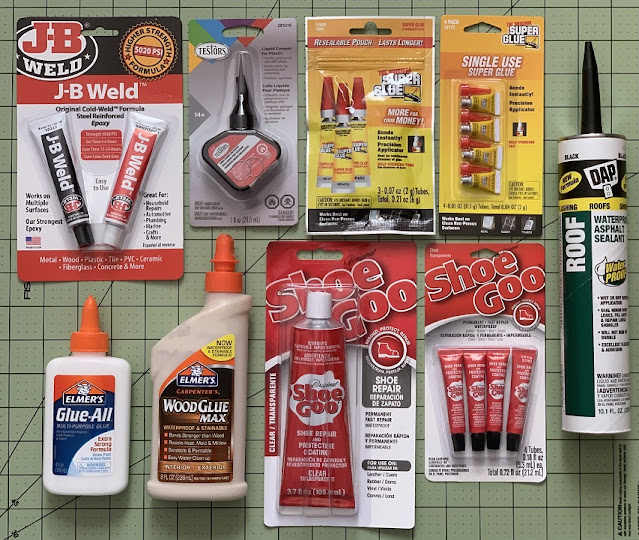
Some of the adhesives discussed in this article.

    I have been fixing things almost my entire life. In prior articles, I discussed various tools I regularly use. In this article I want to highlight some adhesives I frequently use for home and automobile repairs.

    As mentioned in prior articles, my father taught me to fix many things as I was growing up. My father had his favorite adhesives, some of which I use, and some of which I don't use. My father usually used 24-hour-cure two-part epoxy,contact cement, and liquid plastic cement. He also occasionally used the two-part 5-minute-cure epoxy, and hide glue for some wood furniture repairs.

    There were probably a few other adhesives he used, which I don't remember. I no longer use the 5-minute epoxy and contact cement because their results have been unsatisfactory. I never got satisfactory results with hide glue.

    Many items in the home and parts in vehicles are not amenable to repair with traditional fasteners (nails, screws, bolts, rivets), but must be somehow glued back together or replaced. With the economy worsening and continuing supply chain issues, replacement may become unreasonably expensive, unreasonably delayed, or even impossible. Further, I have saved a bundle of money by repairing things myself.

    When using adhesives, it is important to select the correct adhesive for the task. The packaging for most adhesives will describe which materials it works best with, and which materials to avoid. So, always consult the packaging for guidance when selecting a particular adhesive. There is also an experience component to selecting the correct adhesive, which can only be learned by doing.

    Surface preparation is also important when using an adhesive. You certainly want to have a clean surface free of dirt, dust, oils, and liquids. Also, roughing up the surface of solid materials with sand paper or a file will frequently help with adhesion. Although, for an item that has not broken completely, but just has a crack, making sure the material in the crack is clean may be sufficient.

    When repairing something that is broken, proper alignment of the broken pieces is important. Proper alignment will result in a stronger repair that will look better.

    With most of these adhesives, being able to hold or clamp the parts together afterward until the glue cures is critical to getting a serviceable repair. Depending on the repair, tape, rubber bands, clamps, bungee cords, heavy weights, or some combination of these items may be necessary to hold the parts together.

J-B Weld 24-Hour Epoxy

    My favorite adhesive for many repairs is J-B Weld epoxy. It is a two-part epoxy with a 24-hour cure time. It cures to a gray color. When cured, it is solid enough to be filed and drilled. I can't begin to list all the items I have repaired with J-B Weld epoxy. But, items repaired include the plastic housing for a vehicle side mirror, the broken plastic snap mounts for an electric lock mechanism inside a vehicle door, and broken screw posts inside an electronic device.

    I once had a 35-gallon steel drum I was using to store gasoline. After the drum was full, I notice gasoline leaking from a pit in the side of the drum. The pit was not from rust. I didn't want to empty the drum to fix the pit. I ended up laying the drum on its side, with the pit on top, sanded the area around the pit to remove paint, and then used J-B Weld epoxy to seal the hole. After the epoxy had cured, the drum no longer leaked.

    I do not like 5-minute epoxy. In my experience it has always had inferior performance. It doesn't adhere as well as the 24-hour epoxy and it is not as strong. Further, I do not like epoxy packaged in those dual-syringe dispensers because they cannot be tightly sealed after use.

Shoe Goo

    Shoe Goo is another favorite adhesive. As should be obvious from the name, it is useful for fixing shoes. I have used it to glue soles back on shoes, glue seams that failed, and even build-up worn soles so I could continue to wear those shoes.

    Shoe Goo remains flexible after "drying" (curing), and it adheres to many different materials. I've used it to bind stacks of loose paper into books by smearing the Shoe Goo along the side of the stack I wanted to become the spine of the book, then waiting for the glue to cure.

    Shoe Goo is good for repairing many other materials - think of the wide variety of materials from which shoes are made - when a flexible waterproof bond is required.

    Shoe Goo is messy to work with. Either wear thin nitrile gloves or be prepared do clean glue residue from your hands afterward. I personally don't bother with gloves and clean my hands afterward.

    About the only downside to Shoe Goo I have found is that after you puncture the metal seal to the tube, the contents of the tube will only last about six months, even if the tube is tightly capped. After about six months, it becomes very difficult to get the glue out of the tube and the glue you can get out does not adhere very well. However, as I was writing this article, I discovered that Shoe Goo is available in small tubes probably intended for single use (https://www.amazon.com/dp/B01JCCKWZO). These small tubes are obvious more expensive per ounce than the large tube, but may turn out to be cheaper per use when you consider how much of a regular tube will be wasted if not used soon enough after opening.

DAP Black Waterproof Roof Sealant

    DAP asphalt roof sealant is another one of my regularly used adhesives. This product probably wouldn't even be on my favorites list if my house was not located near the crest of a hill, with my roof occasionally experiencing wind damage. Besides replacing the damaged and missing shingles, part of my roof repair process involves tacking down the shingles around the replaced shingles with this roof sealant to make the repair more wind proof. [Ed: I have made a few repairs like this myself in past, although using black silicone because that is what I had on hand and I was ignorant of DAP. This type of repair is acceptable for the occasional lost shingle, but more extensive loss of shingles due to wind damage should be turned over to your property insurer for repair or replacement].

    When this asphalt roof sealant is first squeezed from its tube, it is black, but any of it that is exposed to sunlight soon fades to a medium grey.

Cyanoacrylate - a.k.a. Super Glue

    I have a love-hate relationship with cyanoacrylate. Sometimes it works really well, and sometimes it is terrible.

    One of the problems I have with cyanoacrylate is that the unused portion in a tube eventually dries out. Since I use it only infrequently, I may not discover it is dried out until I want to use it. However, I have discovered that Super Glue branded cyanoacrylate is available in a package of four small single-use tubes at Dollar Tree ($1.25), or a package of five tubes from Amazon for ($6.55).

Testers Liquid Cement for Plastic

    Tester's liquid plastic cement is really a solvent. It glues plastic by dissolving it so the two pieced being glued kind of melt together, becoming a permanent bond once the solvent has evaporated. It is only useful for polystyrene and ABS plastics. It will not work on other plastics.

    Many inexpensive plastic items are made from polystyrene, which is why I regularly find uses for this glue.

    Liquid plastic cement should be used sparingly. While I use Tester's liquid plastic cement fairly regularly, I use it in such small quantities that a one-ounce bottle I bought in the mid-1990s is still at least half-full.

White Glue - Elmer's Glue

    Everyone should be familiar with white glue. It is the glue we all used in grade school after moving beyond the "yummy" paste used in kindergarten and first grade.

    White glue is most useful for gluing paper, cardboard, and wood. The packaging says it is also useful for gluing cloth, leather, ceramics, and other semi-porous materials. White glue is water soluble, so it should not be used where the item being glued may get wet or be exposed to high humidity.

    Besides using white glue on wood, paper, and cardboard, I have used white glue for gluing broken ornamental ceramic items back together. It is not suitable for repairing ceramic items that will get wet or be used to serve food.

Carpenter's Wood Glue

    Carpenter's wood glue is chemically similar to white glue, but some varieties are also waterproof. (Spend the slight extra money and get the waterproof variety.) The waterproof variety can be used where the repaired item may occasionally get wet (but not submerged). The packaging says it can be sanded and painted, but I have not personally tried to do so.

    In the past, I used white glue when joining wood together or repairing wood items, but I now use carpenter's wood glue. When repairing something where the wood broke or split, I will apply the glue to both surfaces, and either clamp the item together, or if the repair will be hidden, use screws to hold the split/broken wood together.

    Carpenter's wood glue is not suitable for structural wood repairs. Instead use a construction adhesive like Liquid Nails, along with screws.

Honorable Mentions

    Ultraviolet light cured adhesive. A few years ago, UV cured adhesives became available to consumers - probably because UV LEDs to provide the curing light source became available at modest prices. I have primarily used UV cured adhesives to glue display windows for small electronic devices back in place.

    Since the glue is UV cured, I am able to carefully fit the display window and clean up any excess adhesive before exposing it to the UV light to cure the adhesive. UV cured adhesives should not be used with opaque materials, or with materials that will block UV light. (For all but the smallest of repairs, a multi-LED UV flashlight (e.g. this modestly priced Harbor Freight model) will allow you to make repairs using UV cured adhesives quicker and more reliably.)

    Clear silicone sealant. While technically not a glue, silicone sealant adheres well to some plastics and many other porous and non-pourous materials, and it is waterproof. I once used silicone sealant to repair a crack that had formed in the plastic windshield washer reservoir of one of my vehicles. The repair was still holding when I traded-in the vehicle a couple of years later.

    Epoxy putty for fuel tank repair. Fuel tank repair is something you don't worry about until you need to fix a fuel tank. I had gasoline stolen out of a vehicle by a thief who used an ice pick to punch a hole in the bottom of the fuel tank.

    Be aware that some fuel tank repair kits require the tank to be drained before applying the adhesives. I successfully used an epoxy putty fuel tank repair kit whose packaging specifically stated it adhered even if the surface was wet with gasoline.

Summary

    As I was doing some background research for this article, I came across a web site that highlights many different adhesives and their practical uses: https://gluereview.com/

    Just like tools, adhesives make many repair tasks possible or easier. J-B Weld 24-hour epoxy, and Shoe Goo are my two favorite adhesives because of their utility, and hence I have a modest stockpile of them. I also have a reasonable inventory of cyanoacrylate because it is so cheap and can be used for many repairs. All of the adhesives mentioned above should be available from many of your local retailers.

Monday, December 13, 2021

The Realist: Specialty Tools for Home and Automobile Repair

 This is the third in a series by the Realist on tools for the prepper. You can find Part 1, about common hand tools for home repair, here; and Part 2, "Tools for Diagnosing and Repairing Electrical and Electronic Problems" here. The Realist writes:

Disclaimer: All products mentioned in this article were purchased by myself. I did not receive samples, evaluation models, or other compensation from any manufacturer or retailer. I have no formal relationship with any manufacturer or retailer mentioned in this article - I have only been an arms-length customer. All brand names and product names used in this review are the trade names, service marks, trademarks, or registered trademarks of their respective owners. I am not a licensed or certified tradesman. Further, this article reflects my unique circumstances and subjective opinions with regard to performance and other characteristics of the products being discussed. Your mileage may vary.

    Growing up, my father taught me how to fix many things. Since then, my repair skills have continued to improve. Besides having the knowledge of how to fix things, having the appropriate tools is necessary to fix many things.

    As the economy worsens, the need to diagnose and repair things yourself, rather than paying others or discarding a failed item, will become increasingly necessary. I have no idea how much money I have saved by being able to fix things myself. Even though I dislike working on automobiles, I have made many automobile repairs over the years, again saving a lot of money.

    You learn how to repair things by doing repairs. Although, now there are many excellent YouTube videos that explain how to perform various repairs, and you can dramatically shorten the learning curve by watching a few videos on a specific repair topic.

    Specialty tools exist for a reason. They make repair tasks far easier than the repair would be without those tools. In some cases, repairs are virtually impossible without specialty tools. For example, consider the AR-15 barrel nut wrench. There is really no other tool that can be used on that barrel nut.

    Below are a few specialty tools that I have that make specific repair tasks around the home or on an automobile easier.

Bit sets: At the top is the handle for the small bit set immediately below - there are more bits on the back side of the holder. At the bottom is the quarter-inch hex drive bit set, with the security bits in their own rectangular orange holder.

Screwdriver Bit Set

    Sometimes, manufacturers use screws with unusual heads, or use security (tamper resistant) screws. A bit set that contains an assortment of bits for those security screws can make a repair project much easier. I have two different bit sets. One set is a collection of quarter-inch hex-drive bits. The other set is a collection of 4 millimeter hex-drive bits intended to be used on portable consumer electronics products. In addition to those, I have collected a variety of other special purpose bits, such as those to use on various Nintendo products.

    Both bit sets have security bits, various sizes of Torx bits, hex bits, Phillips bits, straight bits, square bits, and tri-wing bits.

    One of those security bits saved the day a few months ago when an HVAC technician, working on a neighbor's air conditioner, encountered tamper resistant caps on the service ports. (Tamper resistant caps prevent theft of refrigerant.) The technician did not have a bit for that particular style of cap, and getting one would have potentially taken him several hours.

    I purchased my bit set at a flea market many years ago, but similar sets with the same or improved selection of security bits are available from a variety of sources including Amazon and Harbor Freight Tools.

Specialty tools: At the top is the classic all metal Yankee Push Drill, with the plastic handle push drill below, and a set of bits to the left. Below the push drills, from left to right are needle nose pliers (above), Hakko wire cutters (below), Klein Tools crimper/cutter/stripper, Harbor Freight Doyle side cutters, Channellock 558 hose clamp pliers, and small and large strap wrenches.

Hose Clamp Pliers

    I didn't discover hose clamp pliers until after my last washing machine repair adventure. Appliances and automobiles frequently use spring wire hose clamps. Most of the time, the ears you must squeeze to loosen the clamp are easy toaccess and squeeze with regular pliers. With that washing machine, one hoseclamp was particularly difficult to reach. It came off without any trouble. Putting it back on was more difficult. I fiddled with it for over a half hour using just about every different type of pliers I had. Eventually, I was able to get the hose clamp where it needed to be. If I had used hose clamp pliers, it would have only taken seconds to put the hose clamp back where it belonged.

    After that hose clamp experience, I purchased Channellock 558 hose clamp pliersI don't know if Channellock makes those pliers any more - several vendors I checked seemed to be out of stock. Fortunately, Irwin Vise-Grip makes a very similar product that is available. There are other styles of hose clamp pliers available, but this style looked more robust.

Needle Nose Pliers

    Needle nose pliers are a form of long-nose pliers, which have very thin delicate jaws. They are very useful for reaching into tight places. Because their jaws are so thin and delicate, applying any significant force with them could irreparably damage them. I typically use these when working on electronic devices which have lots of tiny screws in difficult to reach places.

    The specific model I use is no longer available, however Weller Xcelite makes a similar model.

Strap Wrench

    A strap wrench consists of a flexible strap attached to a wrench-like handle. It is designed to loosen or tighten comparatively fragile cylindrical items or irregularly shaped items, such as oil filters and some plumbing fixture parts.

    Once the strap is wrapped around the item, tension of the strap to the grip holds everything tight while you loosen or tighten the item.

    I have used a small strap wrench to loosen and tighten a thin threaded brass ring that holds a shower/bathtub water valve together in my bathroom. This threaded ring lacks flats for a wrench, and water pump pliers would likely damage the ring.

    I purchased my strap wrench set at Lowe's, but similar sets are available from many sources. (I purchased an older version of this set: https://www.lowes.com/pd/Kobalt-2-Piece-Household-Tool-Set/50029434)

Crimpers and Wire Cutters

    A combination wire cutter, wire stripper, and terminal crimper can make wiring repairs easier and more reliable. The terminal crimper is most useful when doing wiring projects in vehicles. I use the Klein Tool model 1010 because it has wide molded handles that allow me to squeeze the tool more comfortably.

    If you get one of these tools, make sure to get an assortment of crimp connectors to use with the tool. Don't buy the cheapest assortment you can find - the metal will be too thin to make reliable connections. Also, avoid the inexpensive cutter/crimper tool and connector assortment kits - the tool and connectors will be poor quality.

    For electronics work, I like to use Hakko brand wire cutters, although there are other very similar wire cutters available. These cutters are intended only for cutting small diameter copper wire. They also work well for cutting zip ties. Cutting iron wire will destroy them.

    If you need to cut larger wires or cut iron wire, nails, or staples, side cutters are needed. (E.g. https://www.harborfreight.com/8-in-high-leverage-diagonal-cutting-pliers-64570.html)

Yankee Push Drill

    The Yankee Push Drill is a manual drill that is roughly the size of a screw driver. It rotates the drill bit by pushing the handle. It does not use any electrical power - you power it with your muscles. The Yankee Push drill uses unique double fluted bits that are not twisted like traditional drill bits. The classic all metal Yankee Push Drill is rather expensive at ninety dollars. I purchased mine, which has a heavy plastic handle, many years ago for far less, but it is no longer available. If you get a Yankee Push Drill, make sure to get spare bits for it (https://www.amazon.com/dp/B004ST1RZ6/ or https://garrettwade.com/product/garrett-wade-push-drill).

    There are a variety of other non-electric manual drill tool options, including "push-pull" spiral drive screwdrivers, some of which take quarter-inch hex bits (which could likely accept quarter-inch hex drive drill bits - I have not tried this).

    I have mostly used my push drill to drill pilot holes in wood for screws. It is far easier to carry and use a push drill than an electric drill (even if battery powered).

OBDII Code Reader

    When the "check engine" light comes on in your vehicle, what do you do? Ignore it and hope it goes away? Take your vehicle to a mechanic and hope you don't get cheated? For modern automobiles, an OBDII code reader can identify many automobile problems. Even if you can't fix the problem yourself, it allows you to be better informed when you do take your vehicle to a mechanic for repair.

    Sometimes, the fault that causes the "check engine" light to come on is the result of a transient event, and "fixing" the problem is no more difficult that clearing the fault code. If the problem returns, then you can start pursuing a solution. (Some fault codes can be cleared simply by disconnecting the vehicle's battery for fifteen or twenty minutes. Unfortunately, your vehicle's radio will probably lose its station presets and time, and other unexpected settings might be cleared. I had a vehicle that would lose its steering wheel angle sensor settings whenever the battery was disconnected - easy to fix without any tools once I learned the non-obvious trick to setting it.)

    Several years ago with my vehicle, I would sometimes feel the engine missing when going up a hill on my way to work. Further, the check engine light would sometimes come on. By the time I got home, the check engine light had gone out, and checking for fault codes with the code reader showed no faults. (I'd later learn that some transient faults may be cleared automatically after a couple times starting the engine.) Eventually, I took the code reader to work with me, and checked the codes sitting in the parking lot at work. The code reader told me that one of the coil packs on a particular cylinder had produced the fault.

    To verify the fault was with the coil pack, and not upstream wiring, I moved it to another cylinder. The fault now showed up on that cylinder. I replaced the faulty coil pack, and the problem went away.

    I am now on my second code reader. The first one consisted of a handheldelectronics package with a display, and a cable that connected to the OBDII port under the dashboard of my vehicle. It worked well for what it did, but had some limitations. My current code reader, which I purchased four years ago, is the BlueDriver OBDII code reader. It is a Bluetooth dongle that plugs into the OBDII port, and then connects to my smartphone via Bluetooth. The app on the smartphone provides the display and controls for the code reader. While there are cheaper code readers and Bluetooth dongles, BlueDrive provides regular app updates and maintains a database of various fault codes and fixes for most vehicles.

    My OBDII code reader has saved me a lot of money on automobile repairs. Even when I ultimately decided to take my vehicle to a mechanic for repair because I did not feel my skills were sufficient, I was able to tell the mechanic exactly what faults I had seen.

Summary

    There are specialty tools for a wide variety of tasks. The tools discussed in this article are a few of the many specialty tools I use on occasion. I highlighted these tools because they would benefit many people who are wanting to perform infrequent but necessary repairs around their home or on their vehicles. These are the specialty tools I have found, in my experience, to be most useful.

Monday, December 6, 2021

The Realist: Tools for Diagnosing and Repairing Electrical and Electronic Problems

This is the second in a series by the Realist on tools for the prepper. You can find Part 1, about common hand tools for home repair, here. The Realist writes:

 From left to right, wall outlet circuit tester (above), USB multimeter (bottom), non-contact voltage tester, Fluke 87 III multimeter (my primary multimeter) with test leads, and Fieldpiece SC53 HVAC multimeter with test leads.

    Disclaimer: All products mentioned in this article were purchased by myself. I did not receive samples, evaluation models, or other compensation from any manufacturer or retailer. I have no formal relationship with any manufacturer or retailer mentioned in this article - I have only been an arms-length customer.

    All brand names and product names used in this review are the trade names,service marks, trademarks, or registered trademarks of their respective owners.

    I am not a licensed or certified tradesman. Further, this article reflects my unique circumstances and subjective opinions with regard to performance and other characteristics of the products being discussed. Your mileage may vary.

    Growing up, my father taught me how to fix many things. Since then, my repair skills have continued to improve. Besides having the knowledge of how to fix things, having the appropriate tools is necessary to fix many things.

    As the economy worsens, the need to diagnose and repair things yourself, rather than paying others to make repairs or discarding a failed item, will become increasingly necessary. Being able fix things myself has saved me a bundle of money.

    You learn how to repair things by doing repairs. Now, there are many excellent YouTube videos that explain how to perform various repairs, and you can dramatically shorten the learning curve by watching a few videos on a specific repair topic.

    Diagnosing electrical problems can benefit from the use of specialized tools, but don't forget to engage your brain, too.

Your Brain - Careful Observation

    Many electrical problems can be solved by nothing more than careful observation.

    A few years ago, my modern LCD television started having the sound cut out in one or both speakers - very annoying - and it got progressively worse. So, I decided to open it up to figure out what was going on. Given how the problem had progressed I expected to find cracked solder joints. (Thermal cycling from turning on and turning off many devices can introduce stresses that can eventually crack solder joints, and reflowing the cracked solder joints will fix the problem.) I carefully examined the solder joints in the audio portions of the circuitry, but saw nothing that looked amiss. Then I noticed that the spade connectors on the end of the wires connected to the speakers seemed loose, really loose. I unplugged them, squeezed them slightly with pliers so they would connect firmly, and reattached the wires to the speakers. I have not had any audio problems with that TV since then.

    In my experience, many electrical and electronic problems are really mechanical problems such as loose connections or broken wires.

Multimeter

    Frequently, I have to diagnose apparent electrical problems. To do this, I usually use a multimeter. A multimeter has the ability to measure voltage, resistance, and current. Many multimeters have the ability to perform additional tests.

    My first multimeter was an inexpensive analog model I purchased as a kit from Radio Shack. I used it for many years before advancing to a digital multimeter.

    For some tasks, an analog meter is actually superior to a digital multimeter. If you are wanting to observe a fluctuating electrical occurrence, such as varying voltage from a flakey alternator, being able to watch a needle move is more informative than watching numbers change on a digital display. Some digital multimeters incorporate a bargraph along the bottom of the display to simulate the movement of the needle in an analog multimeter.

    Today, most multimeters are digital, with analog multimeters being less common. 

    Digital multimeters range in price from almost free (remember the free-with-purchase Harbor Freight digital multimeters?) to models costing thousands of dollars. (Those free (regularly priced $5-6) Harbor Freight multimeters were terrible quality and unsafe to use for anything beyond automotive voltages (12 VDC).)

    As a practical matter, even the most basic multimeter can perform a variety of home and automotive diagnostic tasks. The most common tasks I perform with a multimeter include verifying voltage in a circuit, measuring the voltage output from a battery (is it dead or not), checking for broken wires ("continuity check" using the resistance setting), and checking to see if a filament light bulb is burned out or not - yes, sometimes it is not obvious that the bulb has burned out.

    As mentioned above, multimeters range in price from practically free to thousands of dollars. In general, I would avoid any multimeter costing less than fifteen or twenty dollars. For fifteen to twenty dollars, you can buy a basic digital multimeter that has most of the same functions as the Harbor Freight free multimeter, but is better made and incorporates some added safety features.

    My primary multimeter is the Fluke 87 III, which is overkill for most home and automotive repair activities. Pictured, I also show an older Fieldpiece SC53 multimeter, the style of multimeter typically used by HVAC technicians, which includes a clamp-on current meter used for measuring the current draw of motors in HVAC systems.

    (Fun fact: Many of the low-cost digital multimeters, such as the "free" Harbor Freight multimeter, are based on clones of the 1970s Intersil ICL7106 chip.)

USB Multimeter

    Another very useful electrical tool I use regularly is a USB Multimeter - sometimes called a "Charge Doctor." This is a specialized device you plug into a USB power source, then plug your USB powered device or its charging cable into the USB Multimeter. These devices display voltage and current. (My favorite model is here, but I also use this model)

    USB multimeters do two things. They tell you if your USB power source is actually operational, and they tell you if your USB powered device is actually drawing current (e.g. charging).

    I use a USB Multimeter to check cell phone charging cables (the device plugged into the cable is drawing current), to verify that a device is charging, and to determine when a device is fully charged (as opposed to relying on an indicator light on the device to indicate it is fully charged).

    Once you start using a USB multimeter, you will wonder how you ever got along without one.

Non-Contact Voltage Tester

    Another useful device to have around the house when diagnosing electrical problems, or determining whether or not a circuit is live, is a non-contact voltage tester. The main value of this tool is safety - verifying a circuit is dead before starting to work on it. "Non contact", means you hold the tip of the tool near a wire or wall outlet, and it will beep and flash an LED if an alternating current (AC) voltage is present.

    Yes, you could use a multimeter to verify a circuit is dead, but a non-contact voltage tester is quicker and doesn't require direct access to the wires or terminals.

    Harbor Freight makes a five dollar non-contact voltage tester. I had the previous model, but found it to be a bit flakey. I now have the Sperry Instruments VD6505 in my tool kit.

    There are also multimeters that incorporate a non-contact voltage tester into the body of the multimeter, such as the pictured Fieldpiece SC53, so you can have less tools to juggle when diagnosing an electrical problem.

Wall Outlet Circuit Tester

    I don't use a wall outlet circuit tester very often, but it is a handy gadget to have on hand. You simply plug it into a three-prong wall outlet and it will indicate whether or not the outlet is wired properly. It has three neon bulbs that indicate the state of the outlet. I have primarily used it to test the outlets when I move into a new home. It is also useful to verify that you properly wired everything after replacing a wall outlet.

    Wall outlet circuit testers are fairly inexpensive. I found one on Amazon for less than seven dollars, and Harbor Freight and Walmart have them for less than five dollars. Since I last looked at these testers, many now have a GFCI (ground fault circuit interrupter) test button to test the GFCI outlets that are now common in kitchens and bathrooms.

Summary

    I regularly use a multimeter to solve a variety of electrical problems. A multimeter is really a necessity if you do anything with electricity. Similarly, I use a USB multimeter when dealing with USB powered/charged devices. The other tools mentioned in this article are nice-to-haves that make working with electricity safer and easier.

Monday, November 29, 2021

The Realist: Hand Tools for Common Home Repairs

I hope you all had a good Thanksgiving and weekend. I am pleased to announce that we have a guest post written by The Realist on basic hand tools to keep on hand. Enjoy ....

From left to right: Irwin 9-in-1 screwdriver, 9-in-1 screwdriver disassembled, Klein Tools 4-in-1 electronics screwdriver, 4-in-1 electronics screwdriver disassembled, Channellock model 317 long-nose pliers, 8-inch adjustable wrench, Channellock model 420 water pump pliers, and 7-inch Vice Grip locking pliers.

Disclaimer: All products mentioned in this article were purchased by myself. I did not receive samples, evaluation models, or other compensation from any manufacturer or retailer. I have no formal relationship with any manufacturer or retailer mentioned in this article - I have only been an arms-length customer. All brand names and product names used in this review are the trade names, service marks, trademarks, or registered trademarks of their respective owners. I am not a licensed or certified tradesman. Further, this article reflects my unique circumstances and subjective opinions with regard to performance and other characteristics of the products being discussed. Your mileage may vary.

    Growing up, my father taught me how to fix many things around the home and on our vehicles. Since then, my repair skills have continued to improve. Besides having the knowledge of how to fix things, having the appropriate tools is necessary to fix many things.

    As the economy gets more dicey every day, being able to fix things yourself rather than pay someone else to make repairs or buy a replacement item (if you can find it for sale) will become increasingly important. I have no idea how much money I have saved by being able to fix things myself. Certainly, being able to make repairs around the house has saved me a bundle of money. Even though I dislike working on automobiles, I have made many automobile repairs over the years. Further, I have occasionally purchased non-working or "needs repair" items, and usually been able to repair them, saving money over purchasing the item new.

    You learn how to repair things by doing repairs. Although, now there are many excellent YouTube videos that explain how to perform various repairs, and you can dramatically shorten the learning curve by watching a few videos on a specific repair topic.

    There are three tools I use for probably eighty percent of the repairs I make: a 9-in-1 screwdriver, a 4-in-1 electronics screwdriver, and long-nose pliers.

9-in-1 Screwdriver

    The 9-in-1 screwdriver has three hex-nut sockets and six different screwdriver bits. There are numerous manufacturers selling this type of screw driver. I just happen to have picked up the Irwin brand

    This screwdriver meets the overwhelming majority of my needs. The hex-nut sockets are really handy when doing appliance repairs, and in my experience negated the need to use a socket set or traditional nut drivers. The straight screwdriver tips are ground such that they are parallel, which reduces cam-out when tightening or loosening regular slotted screws.

4-in-1 Electronics Screwdriver

    The 4-in-1 electronics screwdriver, has two small straight tips (1/8 and 3/32 inch) and two Phillips tips (#0 and #00). In the past, I have used other small multi-bit screwdrivers, and would recommend them, except they are no longer sold. I am currently using the Klein Tools screwdriver. There are sets of individual screwdrivers that accomplish the same purpose, but they are not as compact as this screwdriver.

    I use this screwdriver a lot when repairing small appliances and small electronic devices, which frequently use smaller sized screws.

Long Nose Pliers

    The long-nose pliers I use are the Channellock model 317 . I have been using these pliers for
several decades. Harbor Freight sells similar pliers under their Doyle brand that seem to be well made.

    Long nose pliers, as opposed to needle nose pliers, have the strength to squeeze or grab things, yet are thin enough to reach into many tight spaces. They also have wire cutters.

Other Tools I Use Frequently

    While the three tools above address eighty-percent of my tool needs, an adjustable wrench (Crescent wrench), adjustable water pump pliers (grove joint pliers), locking pliers (e.g. Vice Grip pliers) round out most of my tool needs, meeting ninety-percent of my tool needs.

    The adjustable wrench is handy for many tasks. My go-to wrench is 8-inches long. It is small enough and light enough to be used in many tight areas, yet offers more leverage over a smaller wrench. It is the perfect size for assembling many things that come unassembled.

    The water pump pliers are a necessity when doing many plumbing repairs, such as working on the various drain pipes under a kitchen sink.

    The locking pliers are necessary when dealing with a rounded bolt head or grabbing something round that needs to be twisted. (I found the pictured Vice Grip locking pliers along the side of a road several decades ago, cleaned them up, and have been using them ever since.)

Tools You Should Have

    The above tools do not eliminate the need to have other common hand tools, such as a quality socket set, box and open-end wrenches, several different sizes of adjustable wrenches, hammers, pry bar, handsaw for wood, hacksaw for metal and plastics, files, hex wrenches, a Torx bit set, and an electric drill or manual drill. While I don't use these tools as frequently, they are also necessary for a variety of repairs I do perform.

Summary

    Not mentioned in the tools above is a pocket knife. I always have a pocket knife on me, and it gets used for all kinds of tasks.

    Six tools address ninety-percent of my tool needs for household repairs. I regularly use two different sizes of multi-bit screwdrivers, three different types of pliers, and an adjustable wrench. You will note, I didn't include a hammer in this list because I usually use screws for many applications where nails are traditionally used. But yes, I do have several hammers for various tasks.

Vox Day: The Exhaustion Timeline

Vox Day has run some calculations of the number of interceptor missiles have been expended so far in this latest round of war with Iran and ...